
Hey everyone! As a nail art fanatic, I get to see all sorts of amazing designs, but sometimes the most charming ones are the simplest. Today, we’re going to create something truly fin-tastic: tiny goldfish swimming right on your fingertips! This playful fish nails design is perfect for adding a whimsical touch to your look, and it’s surprisingly easy to achieve at home.
Ready to make a splash with your own Gold Fish Nail Art? Let’s get started!
Get Hooked: What You’ll Need for Your Goldfish Fish Nails
Before we dive into painting your cute gold fish nails, gather your supplies. Having everything ready makes the process smooth and enjoyable.

Essential Tools for Perfect Gold Fish Nails:
- Base Coat: Essential for protecting your natural nails and helping your polish last longer.
- Light Blue or Teal Nail Polish: This will be your “water” background for your gold fish nails. Choose a shade you love!
- White Nail Polish: For creating the fish’s belly and eye.
- Orange Nail Polish: Your vibrant goldfish color! A bright orange works best for these gold fish nails.
- Black Nail Polish: For details like the eye and mouth on your little fish.
- Top Coat: To seal in your gold fish nails design and add brilliant shine.
- Dotting Tool or Toothpick: Crucial for small details on your goldfish nails. If you don’t have a dotting tool, a sharpened toothpick works wonderfully.
- Small Detail Brush (Optional): If you have one, it can be helpful for the fins, but a dotting tool can also do the trick for your goldfish nail art.
- Nail Polish Remover & Cotton Swabs/Lint-Free Wipes: For any clean-up during your goldfish nails creation.
Step-by-Step Guide: Creating Your Charming Goldfish Fish Nails
Now for the fun part! Take your time with each step, and don’t worry about perfection – the charm of hand-painted goldfish nails is in their unique, artistic look.
Step 1: Prep & Protect Your Nails

Always start with clean, dry nails. Gently push back your cuticles and lightly buff your nail surface if needed. Apply a thin layer of your base coat and let it dry completely. This creates a smooth canvas and prevents staining, especially when working on detailed fish nails.
Step 2: The Watery Wonderland Base for Your Fish Nails

Apply two thin coats of your light blue or teal polish to all your nails. This is your “water” background for your adorable fish nails. Let each coat dry fully before applying the next. Patience is key here! You want a nice, opaque background for your fish.
Step 3: Body of the Goldfish

Now for our little swimmers! Using your orange nail polish and either a dotting tool or the brush from the bottle, create a small, slightly oval shape on each nail. This will be the body of your goldfish. You can place them swimming in different directions for a more dynamic fish nails look. Don’t make them too big – remember, these are tiny fish! Let this dry for a couple of minutes.
Step 4: The Fishy Belly Detail of Gold Fish Nail Art

With your white nail polish and your dotting tool or detail brush, add a small, curved line or a small oval on the bottom portion of your orange fish body. This creates the goldfish’s white belly, adding depth to your fish nails.
Step 5: Crafting Fins and Tail for Your Gold Fish Nails

Time for the fins! Dip your dotting tool or detail brush into your orange polish again.
- For the tail, create a small “V” shape or two small triangles at the back of the fish body.
- For the fins, add tiny, delicate triangles or short lines on the sides and top of the body. Don’t overthink it; just a hint of a fin is all you need for charming fish nails.
Step 6: How-to Create the Eye & Mouth Details That Bring Your Gold Fish Nails to Life

This is where your fish come to life!
- Using your white polish and a very small dotting tool or the tip of a toothpick, create a tiny white dot for the eye.
- Once the white eye dot is dry, dip your smallest dotting tool or toothpick into black polish and place an even tinier black dot in the center of the white dot for the pupil.
- Finally, with the black polish and your detail tool, draw a tiny, curved line for the mouth. A simple “C” shape works perfectly for your adorable fish nails!
Step 7: Apply The Top Coat Seal for Lasting Gold Fish Nails

Once all your little goldfish are dry (give them a good 5-10 minutes to set), apply a generous layer of your nail polish top coat. This will protect your adorable fish nails design, add incredible shine, and make your manicure last. Be careful not to drag the brush too hard, especially over the wet details. Let it dry completely.
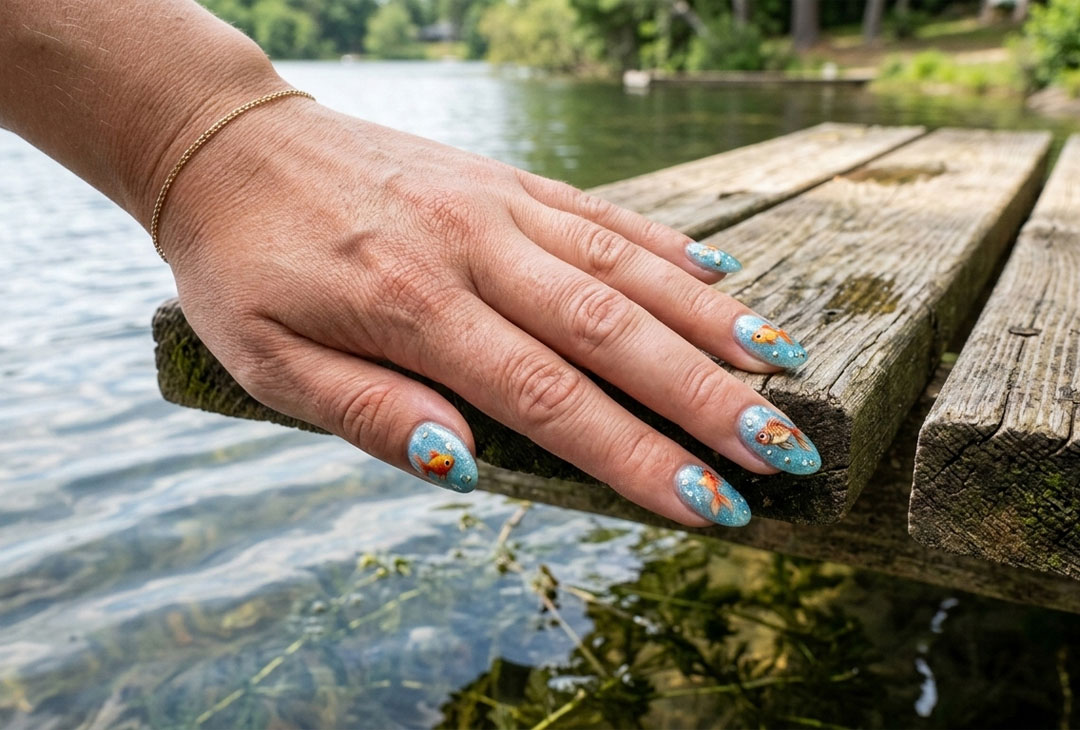
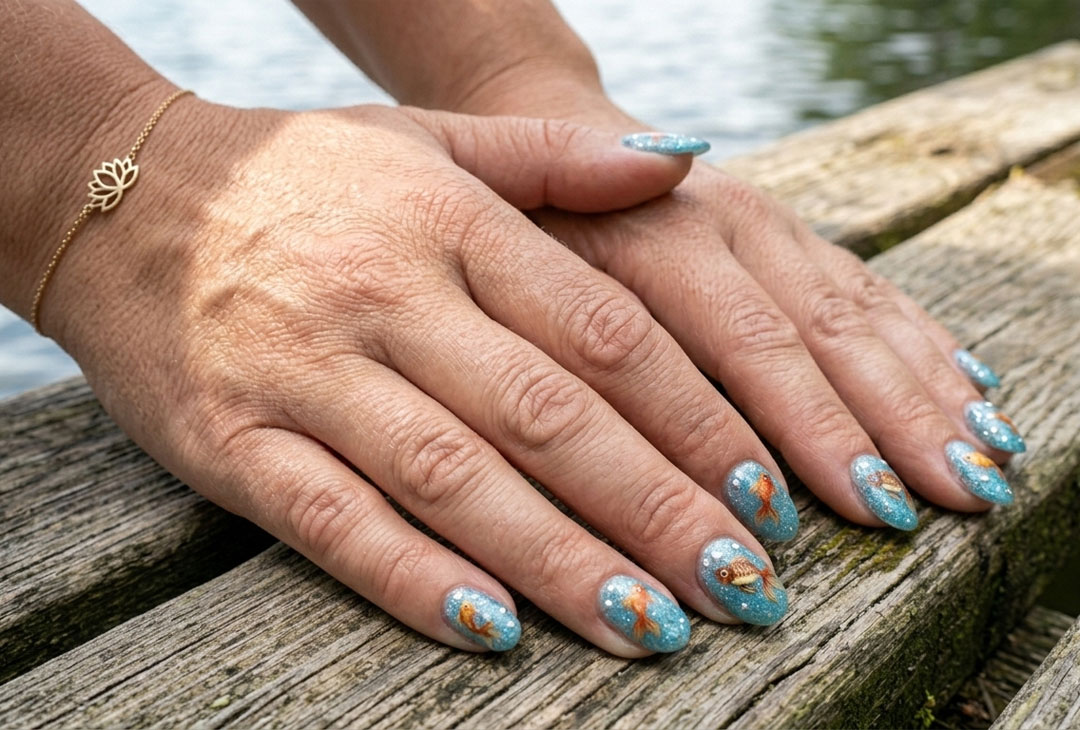
The Big Reveal: Adorable Gold Fish Nails
That Make a Splash!
Pro Tips from Your Nail Tech for Perfect Fish Nails:
- Thin Coats are Key: Always apply thin coats of polish. They dry faster and prevent bubbling, ensuring a smoother finish for your fish nails.
- Practice Makes Perfect: Don’t get discouraged if your first goldfish isn’t a masterpiece. Practice on a nail wheel or even a piece of foil first. You’ll master your fish nails in no time!
- Effortless Clean Up: Keep your cotton swabs and nail polish remover handy for any little mistakes. A small brush dipped in remover can clean up edges beautifully, making your fish nails look salon-perfect.
And there you have it – your very own school of adorable goldfish swimming on your fish nails! This design is a fantastic conversation starter and a fun way to express your playful side. Give it a try, and let me know how it goes in the comments below!
What other cute animal designs would you like to see for your nails? Share your ideas for future fun nail art like these “fish nails”!